
The Sage 300 Number Change utilities have been around for many years, and they are very effective. When an account or an item number is changed or combined with another, all the history of the original account number is also transferred to the new account.
The Number Changers refer to:
These products ship free with Sage 300, but must be activated in the database in order to be used. Go to Administrative Services / Data Activation and select the option for change utility you need. A popup screen will appear. Click Proceed.
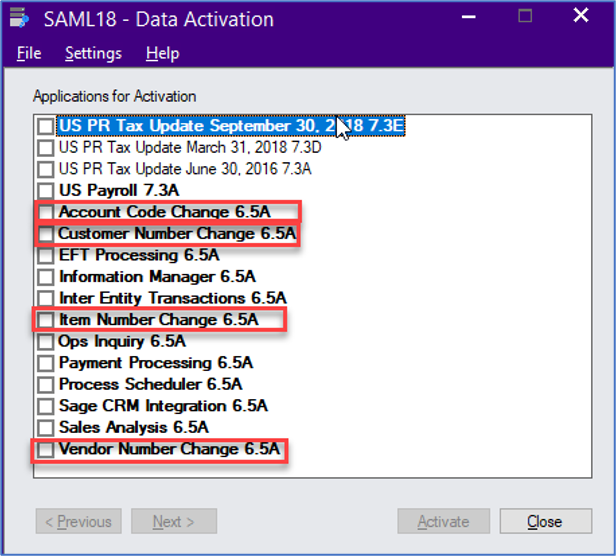
Each Account or Number Change utility will be found under its respective module.
User security must be setup for these modules as with any other module, under Administrative Services. Setup Security Groups and then assign the groups to users in User Authorizations.
Open Account Code Change and click on New. This opens the screen which identifies the detail of the old and new account numbers and the process desired. There are three main functions that Account Code Change can do. These functions are the same for Customer Number Change, Vendor Number Change, and Item Number Change as well.
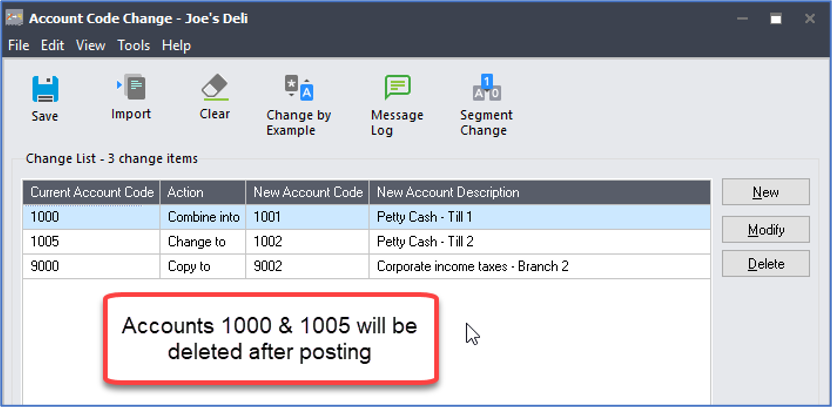
Once a change has been entered, it appears on the main screen and additional changes can be added to the change list. After all changes have been entered and saved in the Change List, backup the data. It is extremely important to have a backup done just prior to posting the changes. If the change process is interrupted or fails, the data will need to be restored to the pre-change state.
After the backup, the changes can be posted. This can only be done when no other users are in the database. During the process, a progress bar is seen on the screen. The utility goes through each data table where the account number is in use, and makes the requested changes in each data table. This ensures that any transactions, documents and history from one account will be transferred to the new account (or the combined account). During a copy procedure, no documents are affected. When the process is complete, a message "Changes successfully posted." will be seen on the screen. For larger databases, this function can take a long time, and it is recommended that the posting be done on a fast workstation, or better yet, directly on the server itself.
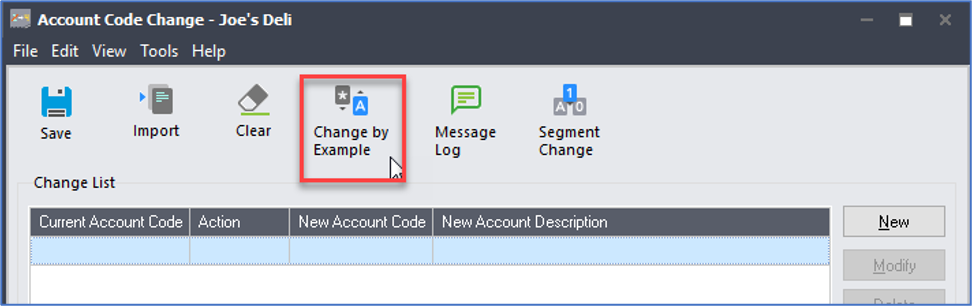
Note - if a large number of accounts require changing, it is possible to import these changes from an excel or csv file, rather than adding them one at a time. The change list can also be populated quickly by using the 'Change by Example' function. Click on the icon from the main screen, or click on Edit / Change by Example:
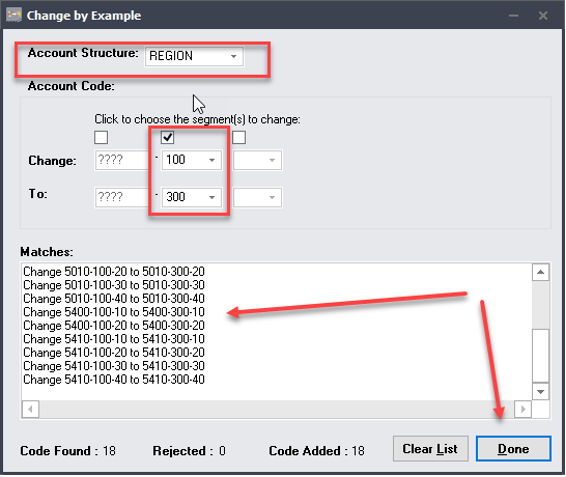
The new screen that pops up allows the user to specify a segment value (or part of a segment value) that should be changed for a range of items. This is effective if the structure or segments are being changed in a consistent manner for many accounts. Click on Match, and all accounts will be reviewed for the changes selected and the list populated in the detail grid. If the results are satisfactory, click on Done to transfer these changes to the Change List.
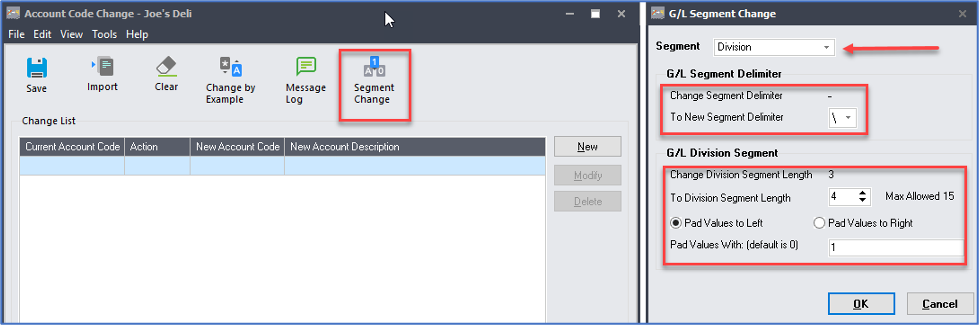
This function allows you to change the delimiter between segments, and also to change the length of a segment. This is especially helpful if you are restructuring your chart of accounts and need more characters in your segment. However, it is possible to either increase or decrease the segment length and then specify whether the additional characters should be padded to the left or right of the original values – or whether the characters to be removed should be truncated from the left or the right.
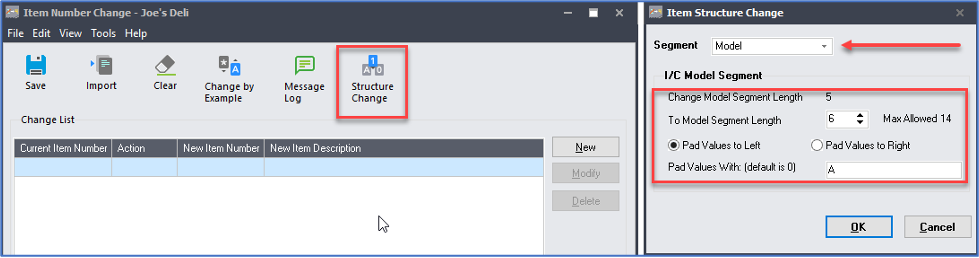
Select Structure Change from the main screen of Item Number Change, and then identify the segment to be changed, and whether or not it is to be increased or decreased.
**The most important thing to remember is to have a backup prior to posting any changes with any of the number changer utilities.
These utilities have been around for many years, and they are very effective. However, they also haven’t changed much over the years, and so the importing function is quite limited. There is no export function, so we cannot generate a template from an export. The import file needs to be created in one of the following formats:
For purposes of this article, we will work with a file created in Excel. The first row is the header row, and you can input the field names, or you can leave them blank. The fields, in order, are:
The Action Types for Field 3 are:
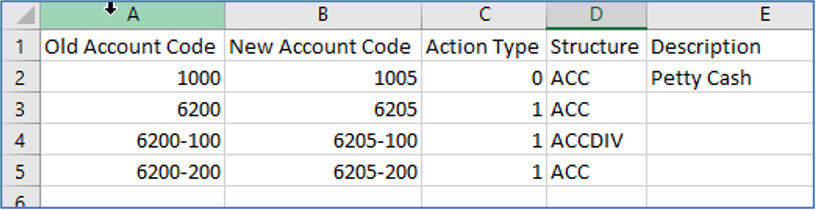
In the example below, account number 1000 is being changed into account number 1005, and account numbers 6200 are being combined into account number 6205. Note that the Description field is not mandatory. This value will be picked up from the database based on the old account code. This means that, during processing, the description of the new account will be modified to whatever is specified, so make sure this value reflects your desired outcome.
When the Excel file is saved, ensure that you save it as 5.0/95 Workbook. (uh huh, yes, this is not a typo, you read that correctly!) If you don’t have access to that old version of Excel, save as a .csv file.
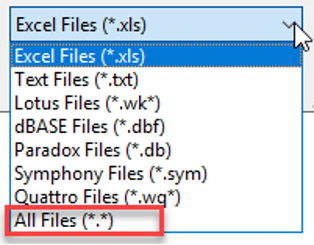
Once the file is saved, open Account Code Change and click on Import. When you Browse to your file, by default, the file type is set to Excel Files (*.xls). Click the down arrow and select All Files (*.*) in order to see your .csv file.
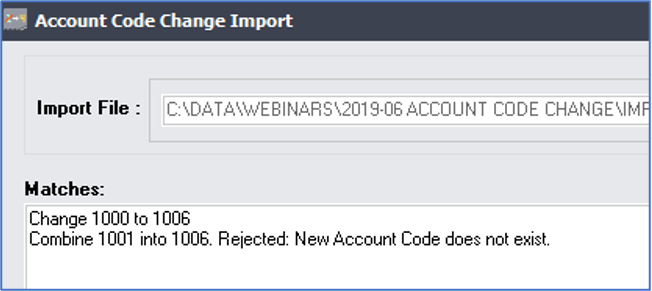
Open your file and import. The change list will be populated with your changes, and if one or more lines are rejected, a reason will be supplied. For example, the combine function below cannot be done since the new account 1006 has not yet been created, even though the creation of the account is listed above the combine function.
If you have any questions or require assistance, please feel free to reach out to our support team at support@equationtech.us.