Sage Intacct and the New 1099 Forms
The IRS has introduced the new Form 1099-NEC for reporting independent contractor income, non-employee compensation. The Form 1099-MISC is still in use, but only to report miscellaneous income and excluding non-employee compensation.
Migrate 1099-MISC Box 7 values to the 1099-NEC form
Previously, you reported on non-employee compensation using the 1099-MISC Form with Box 7. For the 2020 tax year, the IRS requires you to report this information on the 1099-NEC form with Box 1. Below are various ways to perform these updates.
Update vendor default form type, default box, and existing transactions manually
This process only updates transactions already flagged for 1099 treatment. To update non-1099 transactions, use a CSV import file.
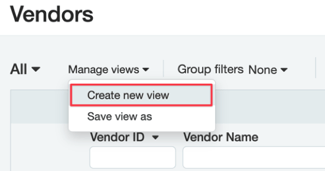
Step 1: Determine which vendors need updating by creating a custom list view
- On the Vendor list, click Manage view > Create new view
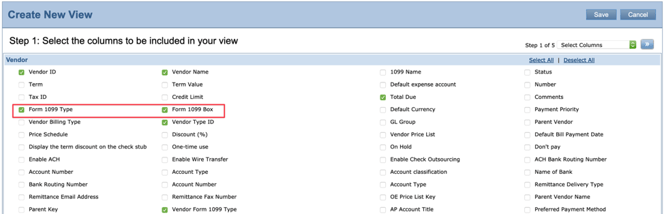
- Select the following columns to be included in your view:
- Form 1099 Type
- Form 1099 Box
-
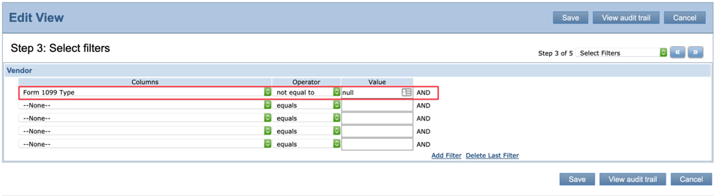
- for Columns, select Form 1099 Type
- for Operator, select not equal to Select the following filters:
- for Value, select null
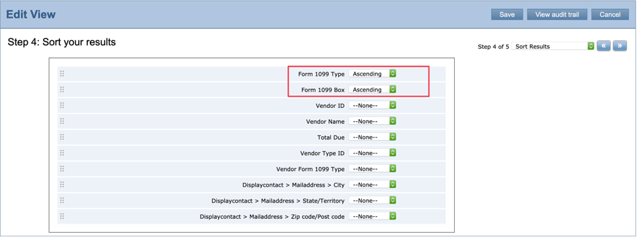
- Optionally, sort your results:
- for Form 1099 Type, select Ascending
- for Form 1099 Box, select Ascending
- Describe your view and give it a Name
Optionally, click Deploy so the view appears for other users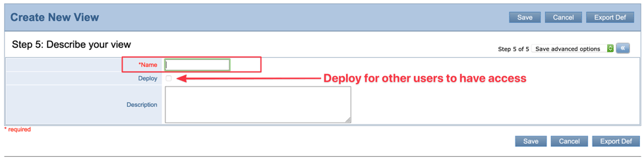
- Save the view
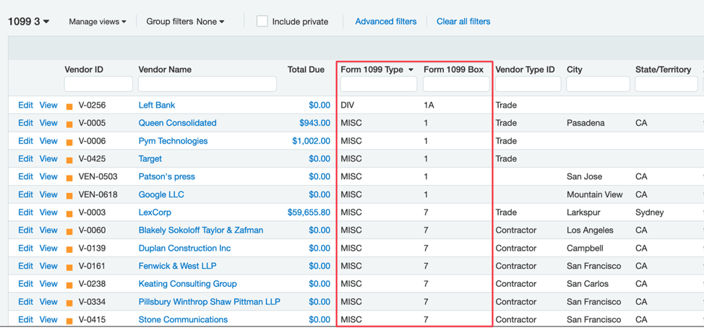
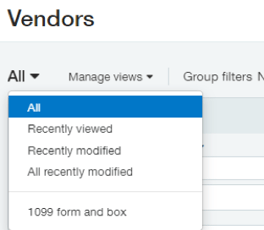
- Back on the Vendors list, click All and select your new view

A list of vendors set up with 1099 default form and boxes appears
Vendors set up for 1099 MISC Box 7 will need to update their information in Step 2
Step 2: Update vendor 1099 form, box, and transactions
- On the Vendor list page, click Edit next to the appropriate vendor
- On the Additional information tab, click the Form 1099 link
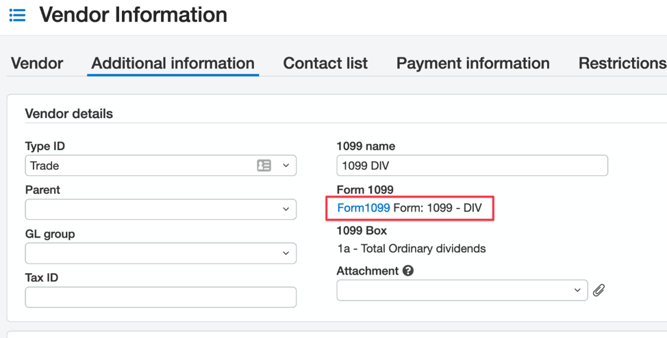
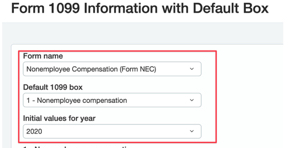
The Form 1099 Information with Default Box page appears. Enter the following information:
- for Initial values for year, select 2020
- for Form name, select Nonemployee Compensation (Form NEC)
- for Default 1099 box, select 1 - Nonemployee compensation
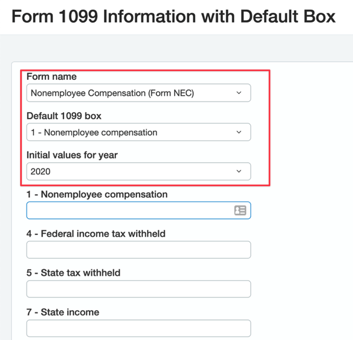
- Add any initial values for the 2020 tax year
These values are the beginning balance for the vendor and are added to the total 1099 amount.
If you entered an opening balance for a box other than the defined Default 1099 Box (in this case, Box 1), make sure to enter 0.00 in the opening balance for the default box (Box 1) to prevent errors in the 1099 Report.
- Click Save to return to the Vendor Information page
- On the Vendor Information page, click Save
The Confirm 1099 updates pop-up window appears
- Determine how to update existing transactions:
- to update transactions paid in 2020, select Update all transactions for this vendor for the current year only based on modified 1099 information
- (recommended) to update transactions paid in 2019 and 2020, select Update all transactions for this vendor for the current year and prior year based on modified 1099 information
- to leave transactions as they are, select Don't update previous transactions
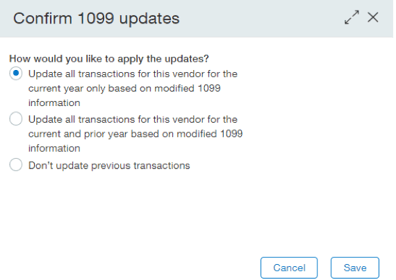
- Click Save
Repeat for each vendor you need to update.
Update vendor default form type and box with a CSV import
Instead of manually updating vendor 1099 information one-by-one through the UI, update multiple vendor records using an import file.
Transactions created for these vendors going forward are tagged with the defined form and box.
You still need to update transactions that were recorded previously so vendor 1099 amounts are accurate.
Step 1: Determine which vendors need updating by creating a custom list view
- Go to Accounts Payable > All > Vendors
- Click the Manage views drop-down and click Create new view
- Select only the following columns to be included in your view:
- Vendor ID
- Vendor Name
- Form 1099 Type
- Form 1099 Box
- Select the following filters:
- for Columns, select Form 1099 Type
- for Operator, select not equal to
- for Value, select null
- Optionally, sort your results:
- for Form 1099 Type, select Ascending
- for Form 1099 Box, select Ascending
- Describe your view and give it a Name
Optionally, click Deploy so the view appears for other users.
- Save the view
Step 2: Apply the custom view, filter, and export vendor information
- On the Vendors list page, select the custom view from the All drop-down
- The list refreshes
- Click Export and select CSV for Import
Step 3: Update information with correct form and box values
- Open the CSV file
- For the FORM1099TYPE column, enter NEC
- For the FORM1099BOX, enter 1
- Save the CSV file on your device.
Step 4: Import information
- On the Vendors list page, click Import
- Select the file
- Refresh the Vendors list page to see your changes.
Result:
Vendors are now tagged to 1099-NEC Box 1. Any transaction going forward will also be tagged to this default form and box.
However, you still need to update existing transactions for the vendor.
Update existing 1099 transactions with a CSV import
To update transactions which were manually entered in the UI to a new form and box, use the Vendor 1099 Transaction Update template. With this import file, you can change a transaction already tagged for 1099 treatment to a new form and box, or you can flag a non-1099 transaction for 1099 treatment.
However, this import does not create new transactions. Instead, first update the vendor default form and box. Then, import bills flagged for 1099 treatment.
This method does not update the following:
- bills paid in 2020 but posted in 2019.Instead, reclassify these transactions.
Details: 1099 forms include transactions for the year in which they were paid, not the year in which the bill was created. This is because the vendor receives the cash when you pay the bill.
- bills imported into the system. Instead, manually reclassify these bills
- vendor opening balances
- transactions manually flagged for 1099. Instead, manually reclassify these bills
For example, you might have flagged a transaction for 1099 treatment even though the associated vendor wasn't set up for 1099 reporting. Or, you might have changed the 1099 form and box for a transaction if your company is enabled for 1099 override.
In this scenario, reclassify these transactions. Or, after you update eligible transactions with a CSV import, update opening balances for the associated vendors to include amounts from manually flagged transactions.
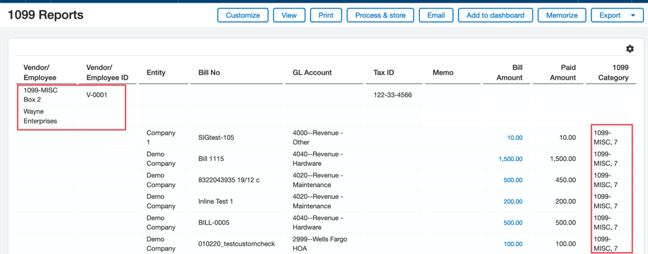
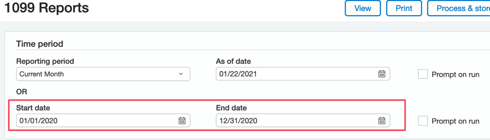
Step 1: Run the 1099 Report and export information
- Go to Accounts Payable > All > Reports > 1099/1096, and click 1099 reports
-
- for Start date, enter 01/01/2020 In the Time period section:
- for End date, enter 12/31/2020

These dates enable you to see transactions paid in the 2020 tax year
- In the Filters section:
- select to Select all vendors
- If necessary, select to Select all employees
- for 1099 form type, select Form 1099-MISC
- for Transaction information, select Only 1099
- for Summary/Detail, select Detail
- Click Process & Store
- Access the report in Accounts Payable > Reports > My stored reports
- Select the report, then click Export and select CSV
- Open the file and remove any transactions that aren't tagged for 1099-MISC Box 7
- Save the file to your local drive
You now have a list of transactions tagged only for 1099-MISC Box 7
Step 2: Download the 1099 Vendor Transaction Update template
- Go to Company > Setup > Import data
The Company Setup Checklist appears
- In the Set up AP Masters List, Open Bills, and Adjustments section, locate Vendor 1099 Transaction Update and click Template
Step 3: Input data from the 1099 report and change values to the correct form and box
- Open the template and enter transaction information from Step 1
- Change the following values:
- For the FORM1099TYPE column, enter NEC
- For the FORM1099BOX, enter 1
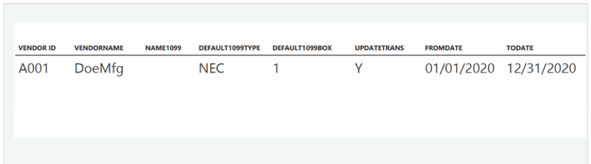
- For UPDATETRANS:
- Enter Y to update only existing 1099 transactions
Transactions not tagged for 1099 are ignored.
Example: Use the UPDATETRANS column and use the value "Y".
Include the vendor ID, date range, default form type, and default box.
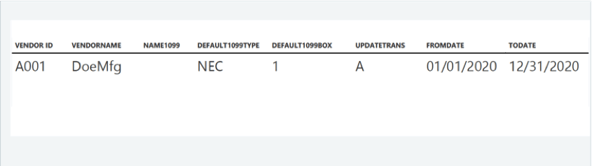
- Enter A to update all transactions whether they are tagged for 1099 treatment or not
Example: Include the vendor ID, date range, default form type, and default box.
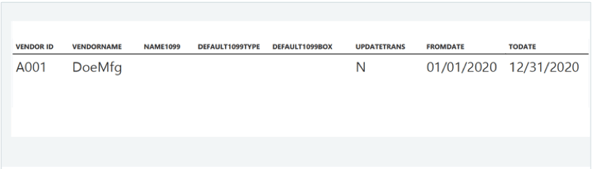
- Enter N to leave transactions as they are without any changes.
Example: Include the vendor ID and date range.
- Save the file on your device.
Step 4: Import information
- Import the file on the Company Setup Checklist page
In the Set up AP Masters List, Open Bills, and Adjustments section, locate Vendor 1099 Transaction Update and click Import.
- Select the file and click Close
Step 5: Confirm changes in the 1099 report
- Go to Accounts Payable > All > Reports > 1099/1096, and click 1099 reports
- In the Time period section:
- for Start date, enter 01/01/2020
- for End date, enter 12/31/2020
- In the Filters section:
- select to Select all vendors
- If necessary, select to Select all employees
- for 1099 form type, select Form 1099-NEC
- for Transaction information, select Only 1099
- for Summary/Detail, select Detail
- Click View
Result:
Any transaction tagged for 1099-MISC Box 7 is now tagged for 1099-NEC Box 1.
Update vendor opening balances manually in the UI
Add 1099 amounts from imported bills (which can't be updated using the Vendor 1099 transaction update), or transactions in closed periods or closed batches by adjusting opening balances.
You still need to update transactions that were recorded previously so vendor 1099 amounts are accurate.
Step 1: Run the 1099 Report to determine existing vendor opening balances
- Go to Accounts Payable > All > Reports > 1099/1096, and click 1099 reports
- In the Time period section:
- for Start date, enter 01/01/2020
- for End date, enter 12/31/2020
These dates enable you to see transactions paid in the 2020 tax year.
- In the Filters section:
- select to Select all vendors
- If necessary, select to Select all employees
- for 1099 form type, select Form 1099-MISC
- for Transaction information, select Only 1099
- Deselect Show minimum eligible amounts
- This ensures all 1099 transactions are included in the report, regardless of whether the vendor total meets the minimum amount required for IRS reporting.
- For Summary/Detail, select Detail
- Click View or Process & Store
The report appears with a list of transactions tagged for 1099-MISC.
If you clicked Process & Store, access the report in Accounts Payable > Reports > My stored reports. Select the report, then click Export and select CSV.
Are minimum amounts appearing in the report?
If you selected to Show minimum eligible amounts only and you're still seeing amounts less than the taxable amount, check the opening balances for the vendor.
If you entered an opening balance for a box other than the defined Default 1099 Box, make sure to enter 0.00 in the opening balance for the default box to prevent errors in the 1099 Report.
- In the Excel file, for each vendor, search and locate the initial values for 1099-MISC Box 7 and take note of the amounts.
Step 2: Update vendor opening balances
- Go to Accounts Payable > All tab > Vendors
- Click Edit next to the appropriate vendor
- On the Additional Information tab, click the Form1099 link
- Select the correct Form name and Default 1099 Box
- Select the correct year from the Initial values for year drop down
- Enter opening balances in the appropriate boxes
A positive amount increases the 1099 amount, while a negative amount decreases it.
If you're entering an opening balance for a box other than the defined Default 1099 Box, make sure to enter 0.00 in the opening balance for the default box to prevent errors in the 1099 Report.
- Click Save to return to the Vendor Information page, then click Save
Step 3: Confirm changes in the 1099 report
- Go to Accounts Payable > All > Reports > 1099/1096, and click 1099 reports
- In the Time period section:
- for Start date, enter 01/01/2020
- for End date, enter 12/31/2020
- In the Filters section:
- select to Select all vendors
- If necessary, select to Select all employees
- for 1099 form type, select Form 1099-NEC
- for Transaction information, select Only 1099
- Deselect Show minimum eligible amounts
- for Summary/Detail, select Detail
- Click View
Are minimum amounts appearing in the report?
If you selected to Show minimum eligible amounts only and you're still seeing amounts less than the taxable amount, check the opening balances for the vendor.
If you entered an opening balance for a box other than the defined Default 1099 Box, make sure to enter 0.00 in the opening balance for the default box to prevent errors in the 1099 Report.
Result:
Opening balance amounts now appear for Form 1099-NEC Box 1.
Update vendor opening balances with a CSV import
Add 1099 amounts from imported bills (which can't be updated using the Vendor 1099 transaction update), or transactions in closed periods or closed batches by adjusting opening balances with a CSV import.
You still need to update transactions that were recorded previously so vendor 1099 amounts are accurate.
Step 1: Run the 1099 Report to determine existing vendor opening balances
- Go to Accounts Payable > All > Reports > 1099/1096, and click 1099 reports
- In the Time period section:
- for Start date, enter 01/01/2020
- for End date, enter 12/31/2020
These dates enable you to see transactions paid in the 2020 tax year
- In the Filters section:
- select to Select all vendors
- If necessary, select to Select all employees
- for 1099 form type, select Form 1099-MISC
- for Transaction information, select Only 1099
- Deselect Show minimum eligible amounts
This ensures all 1099 transactions are included in the report, regardless of whether the vendor total meets the minimum amount required for IRS reporting
- For Summary/Detail, select Detail
- Click View or Process & Store
The report appears with a list of transactions tagged for 1099-MISC.
If you clicked Process & Store, access the report in Accounts Payable > Reports > My stored reports. Select the report, then click Export and select CSV.
Are minimum amounts appearing in the report?
If you selected to Show minimum eligible amounts only and you're still seeing amounts less than the taxable amount, check the opening balances for the vendor.
If you entered an opening balance for a box other than the defined Default 1099 Box, make sure to enter 0.00in the opening balance for the default box to prevent errors in the 1099 Report.
- In the Excel file, for each vendor, search and locate the initial values for 1099-MISC Box 7 and take note of the amounts.
Step 2: Download the Vendor 1099 Opening Balance template
- Go to Company > Setup > Import data
The Company Setup Checklist appears
- In the Set up AP Masters List, Open Bills, and Adjustments section, locate Vendor 1099 Opening Balance and click Template
Step 3: Input data from the excel file and change values to the correct opening amounts
- Open the CSV file from Step 1s
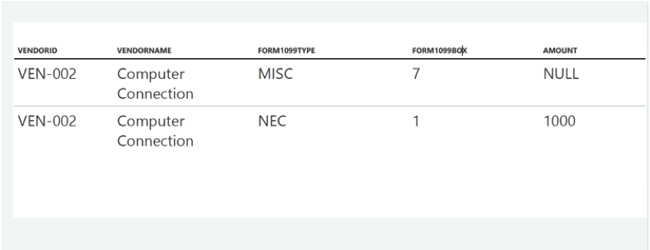
- Input initial values in the Amount column for each vendor based on report findings.
Each vendor requires two lines in the import file: one line with a value of "NULL" to remove the balance for the Form 1099-MISC Box 7, and one positive line to add the total amount to Form 1099-NEC Box 1.
Example
- Save the file on your device.
Step 4: Import information
- On the Company Setup Checklist page, in the Set up AP Masters List, Open Bills, and Adjustments section, locate Vendor 1099 Opening Balance and click Import
- Select the file and click Close
Step 5: Confirm changes in the 1099 report
- Go to Accounts Payable > All > Reports > 1099/1096, and click 1099 reports
- In the Time period section:
- for Start date, enter 01/01/2020
- for End date, enter 12/31/2020
- In the Filters section:
- select to Select all vendors
- If necessary, select to Select all employees
- for 1099 form type, select Form 1099-NEC
- for Transaction information, select Only 1099
- Deselect Show minimum eligible amounts
- for Summary/Detail, select Detail
- Click View
Are minimum amounts appearing in the report?
If you selected to Show minimum eligible amounts only and you're still seeing amounts less than the taxable amount, check the opening balances for the vendor.
If you entered an opening balance for a box other than the defined Default 1099 Box, make sure to enter 0.00 in the opening balance for the default box to prevent errors in the 1099 Report.
Result:
Opening balance amounts now appear for Form 1099-NEC Box 1.
Reclassify existing transactions
Reclassify bills that were posted in 2019 but paid in 2020. 1099 forms include transactions for the year in which they were paid, not the year in which the bill was created. This is because the vendor receives the cash when you pay the bill.
Requires permissions for Reclassify and the vendor must be set up for 1099 treatment. Make sure to Enable 1099 form and box override in Accounts Payable, Purchasing, or Time & Expenses, depending on where the transaction originated.
This method doesn't update the vendor 1099 default form type and box information, and doesn't ensure transactions entered in the future will be tagged appropriately. Make sure to update your vendor information to the correct form and box either with a CSV import or manually through the UI.
To reclassify existing transactions:
Locate transactions in the system tagged for the 1099-MISC Box 7 and reclassify them with 1099-NEC form and Box 1.
Contact us if you have questions or would like assistance with your year end processing.